How to add HTTPS to GitHub Pages in 6 Steps
Tomáš VotrubaI always loved GitHub Pages, thanks to open-source and free hosting. Last thing that made me feel too oldschool was the plain "http://" protocol. That is usually the main argument why people move from GitHub Pages elsewhere, i.e. their own VPS. What a pity.
Fortunately, thanks for Michal Špaček's ability to explain complex stuff in a simple way, we solved this over a single weekend.
WARNING: This post is now DEPRECATED, custom domains on GitHub pages support HTTPS directly since May 2018. Check this GitHub blog for more information.
This site now runs on HTTPS, see: https://pehapkari.cz/ thanks to Michal Špaček who added a simple how-to manual to the GitHub issue. I will try to expand it here.
HTTPS is Hard Easy!
I thought setting up HTTPS is a very difficult process that requires at least owning a VPS, extensive work via SSH and buying, paying and setting up the certificate. This is practically impossible to do with just GitHub Pages.
But is it really?
How to Enable HTTPS in 3 Steps
1. Register on Cloudflare
2. Add Your Site
Cloudflare will pre-fill the DNS records by scanning your current records. Continue.
Pick free plan.
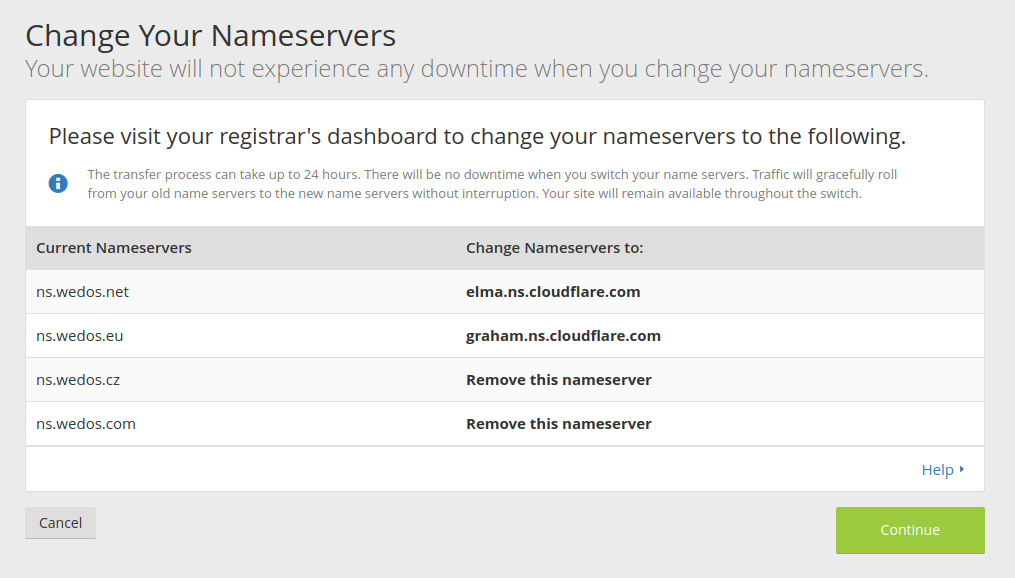
3. Change Name Servers
Go to your domain administration (look for "change DNS servers" or similar) and change current name servers to those provided by Cloudflare. You can either create a new NSSET or change the current one, if your registry supports NSSETs.

Keep in mind that the servers may be different for each domain you add to Cloudflare.
What will happen now?
The site will be served via Cloudflare once the browsers notice the change, that is when the DNS changes are propagated world-wide. That could take some time, from minutes to even days, depending on the expiration of these records in the DNS. Don't worry though, there's no downtime, the site should be accessible either via Cloudflare or not, the change we made doesn'ẗ affect the origin servers – GitHub's in this case – those are still up and running.
The changes could be verified in the browser or using the command-line interface. Look for the Server response header, it should contain cloudflare-nginx.
curl -I http://pehapkari.cz | grep Server
Server: cloudflare-nginx
Now try https://pehapkari.cz, if there's no error, we have HTTPS enabled!
Note that it can take up to 24 hours for HTTPS to enable.
Not quite there yet
Now we have a website running over HTTPS. But it is also accessible without HTTPS, through http://pehapkari.cz, so we need to redirect all HTTP requests to the HTTPS ones. This is especially important due to security, but also to avoid duplicate content (that would hurt SEO).
How to Redirect "HTTP" urls to "HTTPS" in 3 Steps
1. Go to Crypto
Scroll down a bit, roughly to the middle of the page.
2. Enable "Always use HTTPS"
This will redirect both
to their https:// versions.
If you need more or different redirections you can use Page Rules.
3. Verify it Works
Now run this diagnostics using your command-line interface:
curl -I http://pehapkari.cz | grep -i Location
curl -I http://www.pehapkari.cz | grep -i Location
curl -I https://www.pehapkari.cz | grep -i Location
These commands should show:
Location: https://pehapkari.cz/
Location: https://www.pehapkari.cz/
Location: https://pehapkari.cz/
If they do, you're done! If not, leave us a comment below and we'll try to help you and also improve this tutorial.
If you ever get to any security troubles, call Michal to the rescue. Thank you!
